ALA-101 Hybridization Manual
Complete parameter reference for every control.全コントロールの完全パラメーターリファレンス。
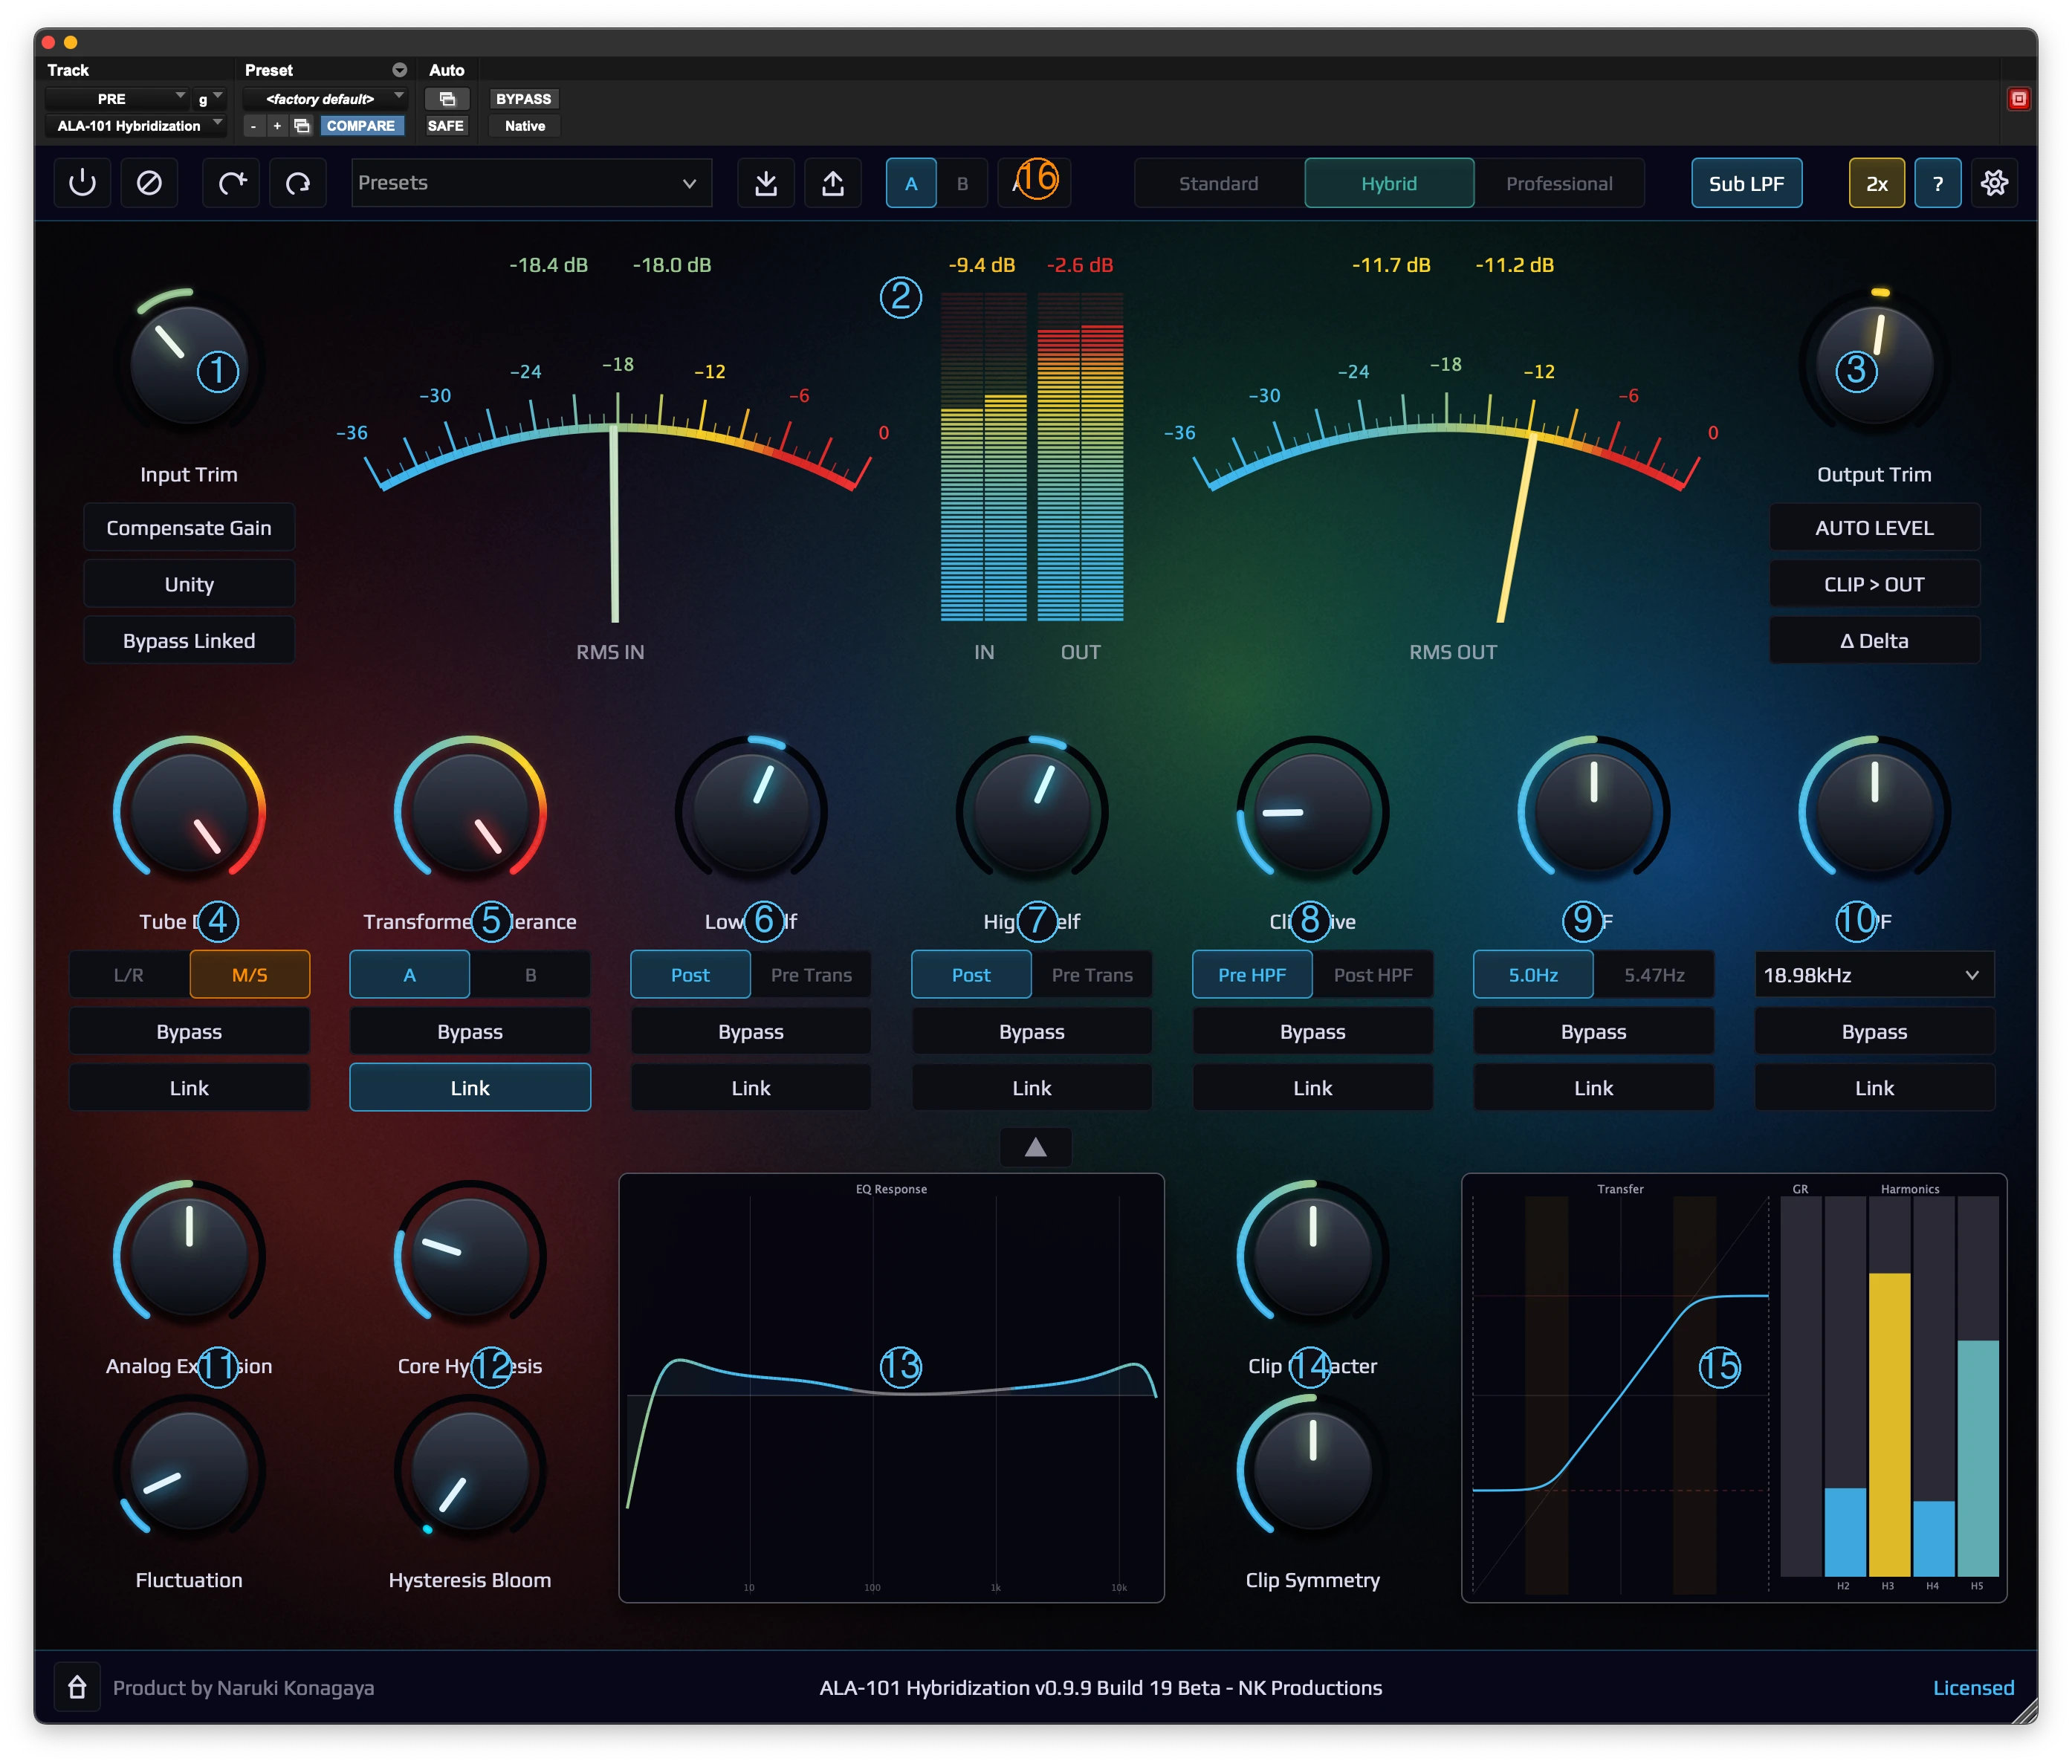
This plugin delivers its best performance at the reference level. Signal levels may deviate from the reference, but modeling accuracy may decrease. Pushing the signal extremely hot into the plugin will result in extreme distortion and heavy compression. The reference level can be adjusted via the gear icon menu (Settings > Reference Level): +4 dBu = -18 dBFS or -20 dBFS. To get the most out of this plugin, always perform gain staging using the RMS meter or the Compensate Gain button. このプラグインはリファレンスレベル領域にて最高のパフォーマンスを発揮致します。もちろん、信号レベルはリファレンスから逸脱しても構いませんが、モデリングの再現性が落ちる場合があります。もちろん信号レベルを極端にプラグインに突っ込む(HOT)にすれば、信号は極端に歪んだり、極端なコンプレッションを感じたりするでしょう。リファレンスレベルは右上の歯車マークのメニューの Reference Level の項目から +4dBu = -18dBFS または -20dBFS で調整が可能です。プラグインの実力を発揮したい場合は RMS メーター、または Compensate Gain ボタンでゲインステージングを必ず行ってください。
Each parameter at 50% (or 5.0) represents the nominal range — closest to the real hardware behavior. Beyond that, the knob color indicates the intensity: yellow signals caution, red signals warning. Some knobs control dB values where caution/warning levels don't directly apply, but the color still represents the strength of the effect. 各パラメータは 50%(ないし 5.0)が標準で、実機挙動に近しい領域だと思ってください。それ以上はノブの色が指し示すように、黄色は警戒領域、赤色は警告領域のイメージを伝えます。一部のノブは dB 調整であるため、ノブの色と挙動が特に警戒・注意・警告に当てはまらない場合もありますが、色で挙動の強さを表していると思ってください。
Automation: Tube Drive and Transformer Tolerance use real-time neural network inference. Rapid or discontinuous parameter changes via DAW automation may produce audible noise, clicks, or unexpected waveform behavior. If automation is required, use slow, gradual transitions. Sudden jumps in these parameters are not recommended during playback. オートメーション: Tube Drive と Transformer Tolerance はリアルタイム推論を使用しています。DAW オートメーションによる急激または不連続なパラメータ変更は、ノイズ、クリック音、予期しない波形の挙動を引き起こす可能性があります。オートメーションが必要な場合は、緩やかな遷移を使用してください。再生中にこれらのパラメータを急激に変更することは推奨しません。
CPU Usage: Professional and higher modes run per-sample neural network inference, which is computationally intensive. CPU spikes may occur regardless of buffer size. If performance is insufficient, switch to Standard or Hybrid mode, reduce the oversampling rate, or bypass unused processing sections. CPU 使用率: Professional 以上のモードはサンプル単位の推論を実行するため、計算負荷が高くなります。バッファサイズに関わらず CPU スパイクが発生する場合があります。パフォーマンスが不足する場合は Standard や Hybrid モードに切り替えるか、オーバーサンプリングレートを下げるか、使用していない処理セクションをバイパスしてください。
① Input
Adjusts the input level within ±24 dB. Nominal input: +4 dBu = -18 dBFS. Knob color changes with signal level. The reference level can be configured in the settings menu. プラグインへの入力レベルを ±24 dB の範囲で調整します。公称入力レベルは +4 dBu = -18dBFS です。信号レベルに応じてノブの色が変化します。リファレンスレベルは設定メニューで変更できます。
Auto-compensates input level to the reference level using a 3-second RMS measurement. The reference level can be configured in the settings menu. 3 秒間の RMS 測定で入力レベルをリファレンスレベルに自動補正します。リファレンスレベルは設定メニューで変更できます。
Automatically compensates Output Trim when Input Trim is changed, maintaining unity gain. Input Trim の変更に連動して Output Trim を自動補正し、ユニティゲインを維持します。
Located above the Input Trim column. Bypasses all sections with Link enabled. Useful for A/B comparison of multiple parameters at once. Input Trim 列の上に配置されています。Link が有効なセクションを一括バイパスします。複数パラメータの ON/OFF を同時に比較する際に便利です。
Located above the Input Trim column. Bypasses all sections with Link enabled. Useful for A/B comparison of multiple parameters at once. Input Trim 列の上に配置されています。Link が有効なセクションを一括バイパスします。複数パラメータの ON/OFF を同時に比較する際に便利です。
② Metering
RMS meter displaying input and output levels simultaneously. Use for gain staging. The reference level can be configured in the settings menu. RMS メーター。入力と出力レベルを同時に表示します。ゲインステージングに使用してください。リファレンスレベルは設定メニューで変更できます。
Sample-accurate peak meter. The reading falls back automatically (approx. 22 dB/s decay); there is no peak hold. サンプル精度のピークメーターです。表示は自動的に減衰します(約 22 dB/s)。ピークホールドはありません。
③ Output
Adjusts the output level within ±24 dB. Knob color changes with signal level. Hover or click to reveal the Dry/Wet knob. プラグインの出力レベルを ±24 dB の範囲で調整します。信号レベルに応じてノブの色が変化します。マウスホバーまたはクリックで Dry/Wet ノブが表示されます。
Performs a 3-second K-weighted loudness measurement and auto-adjusts Output Trim to match the input level. 3 秒間の K 特性ラウドネス測定を行い、入力レベルに合わせて Output Trim を自動調整します。
Routes the signal through the clipper after Output Trim. Useful for final-stage clipping in mastering workflows. 信号を Output Trim の後にクリッパーへ通します。マスタリングワークフローでの最終段クリッピングに有用です。
Outputs only the wet-minus-dry difference signal, allowing you to hear the nonlinear components in isolation. ウェット−ドライの差分信号のみを出力し、非線形成分を単独で確認できます。
④ Tube Drive
Models the dynamic behavior of a vacuum tube line amplifier. The tube's compression characteristic strongly affects the perceived level, which may appear to decrease. Adjust with Output Trim as needed. 真空管ラインアンプの動的挙動を再現します。特に真空管のコンプレッション動作が強く作用するため、聴感上のレベルが下がる傾向にあります。OUTPUT で信号レベルを調整してください。
Switches Analog Expansion between L/R mode and M/S mode. L/R: enhances stereo channel separation. M/S: naturally widens the stereo image. アナログ・エクスパンションの L/R モードと M/S モードを切り替えます。L/R: ステレオのセパレーション感が強くなります。M/S: ステレオイメージが自然に拡張されます。
⑤ Transformer Tolerance
Models the dynamic behavior of an output transformer. 出力トランスフォーマーの動的挙動を再現します。
Switches between Transformer Pattern A and Pattern B. Each pattern has a different saturation characteristic captured from the hardware. トランスフォーマーのパターン A と B を切り替えます。各パターンはハードウェアから計測した異なるサチュレーション特性を持ちます。
⑪ Expansion & Fluctuation
Reproduces analog L/R channel variation. Automatically scales with input level — quiet signals stay matched, loud signals diverge. The knob sets the maximum expansion amount. アナログ回路の L/R チャンネル間の個体差を再現します。入力レベルに連動して自動スケーリングされ、小音量時は L/R が一致し、大音量時に差が顕著になります。ノブは最大展開量を設定します。
Reproduces the subtle wow fluctuation characteristic of analog equipment. アナログ機器特有の微細な揺らぎを再現します。
⑫ Hysteresis & Bloom
Enhances the low-frequency response from transformer core hysteresis. トランスフォーマーのコアヒステリシスによる低域レスポンスを増強します。
Adjusts the hysteresis low-frequency modulation depth. Useful for controlling low-end muddiness or masking. ヒステリシスの低域変調の深さを調整します。低域の濁りやマスキングの制御に使用します。
Applies a low-pass filter to the hysteresis processed signal. Off: no filtering. 2-Pole: gentle roll-off. 4-Pole: steep roll-off. ヒステリシスの処理信号にローパスフィルターを適用します。Off: フィルターなし。2-Pole: 緩やかなロールオフ。4-Pole: 急峻なロールオフ。
⑥⑦ Shelf EQ & Filtering
Reproduces the low-shelf EQ measured from the hardware unit. The cutoff frequency shifts proportionally with the gain amount. ハードウェアから測定したロー・シェルフ EQ を再現します。さらにデザイナーが Gain に応じてカットオフ周波数がシフトする設計を採用しました。
Reproduces the high-shelf EQ measured from the hardware unit. The cutoff frequency shifts proportionally with the gain amount. ハードウェアから測定したハイ・シェルフ EQ を再現します。さらにデザイナーが Gain に応じてカットオフ周波数がシフトする設計を採用しました。
Moves the shelf EQ before the transformer stage (between Tube and Trans). Default position: after Trans. シェルフ EQ をトランスフォーマーの前段(Tube と Trans の間)に移動します。デフォルト位置: Trans の後段。
Displays the composite frequency response of Low Shelf, High Shelf, LPF, and HPF filters. ロー・シェルフ、ハイ・シェルフ、LPF、HPF フィルターの合成周波数特性を表示します。
Adjusts the Q of the transformer-derived high-pass filter. トランスフォーマー由来のハイパスフィルターの Q を調整します。
Switches HPF frequency between 5.0 Hz (Transformer characteristic) and 5.47 Hz (Tube characteristic). HPF の周波数を 5.0 Hz(トランスフォーマー特性)と 5.47 Hz(チューブ特性)で切り替えます。
Adjusts the Q of a mastering-grade ADC converter's high-frequency roll-off filter. Recommended to keep enabled, as the plugin's processing can cause high-frequency phase disturbances. マスタリンググレード ADC コンバーターの高域ロールオフフィルターの Q を調整します。プラグインの性質上、高域の位相乱れが発生する場合があるため、常時使用を推奨します。
Selects the LPF cutoff frequency. Maximum frequency varies by sample rate (18.98 kHz at 48 kHz, 37.95 kHz at 96 kHz, 75.90 kHz at 192 kHz). LPF のカットオフ周波数を選択します。利用可能な周波数はサンプルレートに応じて最大値が変化します(48 kHz 時: 18.98 kHz、96 kHz 時: 37.95 kHz、192 kHz 時: 75.90 kHz)
⑨ HPF
The high-pass filter is derived from the measured frequency response of the hardware output transformer. It removes sub-bass frequencies that the original transformer naturally rolls off. The HPF operates at the oversampled rate inside the processing chain, with a fallback at the session sample rate when oversampling is set to 1x. ハイパスフィルターはハードウェアの出力トランスフォーマーの測定結果から設計されています。実機のトランスフォーマーが自然にロールオフするサブベース領域を除去します。HPF は処理チェイン内のオーバーサンプリングされたレートで動作し、オーバーサンプリングが 1x の場合はセッションサンプルレートにフォールバックします。
Adjusts the Q (resonance) of the high-pass filter. At 0%, the Q is set to the standard Butterworth value (0.707) for a flat, smooth roll-off. Increasing the value adds a resonant bump at the cutoff frequency, which can add weight and presence to the low end — similar to the subtle resonance found in some transformer-coupled circuits. Default: 50%. ハイパスフィルターの Q(レゾナンス)を調整します。0% では標準的な Butterworth 値(0.707)に設定され、フラットで滑らかなロールオフになります。値を上げるとカットオフ周波数付近にレゾナントピークが加わり、ローエンドに重みと存在感を与えます。一部のトランスフォーマー結合回路に見られる微妙なレゾナンスに近い効果です。デフォルト: 50%。
Switches the HPF cutoff frequency between two hardware-derived values. 5.0 Hz corresponds to the transformer's measured characteristic, while 5.47 Hz corresponds to the tube circuit's characteristic. The Tube (Tight) setting provides a slightly tighter low-end roll-off, which can help reduce sub-bass rumble in certain sources. HPF のカットオフ周波数を 2 つのハードウェア由来の値で切り替えます。5.0 Hz はトランスフォーマーの測定特性、5.47 Hz はチューブ回路の測定特性に対応します。Tube(Tight)設定はやや引き締まったローエンドのロールオフを提供し、特定のソースのサブベースの濁りを軽減するのに有効です。
Enables or disables the transformer-derived high-pass filter. Enabled by default. When disabled, the sub-bass roll-off is completely removed from the signal chain, allowing the full sub-bass content to pass through. This may be useful for sources that need their ultra-low frequencies preserved. トランスフォーマー由来のハイパスフィルターを有効/無効にします。デフォルトは有効。無効にするとサブベースのロールオフが信号経路から完全に除去され、すべてのサブベース成分がそのまま通過します。超低域を保持したいソースには有効です。
⑩ LPF
The low-pass filter is modeled after the high-frequency roll-off characteristics of a mastering-grade ADC converter. It operates at the session sample rate (post-downsample) and is recommended to keep enabled at all times. Neural network inference can introduce subtle high-frequency phase disturbances near the Nyquist frequency, and this filter effectively suppresses them without affecting the audible range. ローパスフィルターはマスタリンググレード ADC コンバーターの高域ロールオフ特性をモデリングしています。セッションサンプルレート(ダウンサンプル後)で動作し、常時有効にすることを推奨します。ニューラルネットワーク推論はナイキスト周波数付近で微細な高域位相乱れを発生させる場合があり、このフィルターは可聴帯域に影響を与えずにそれらを効果的に抑制します。
Adjusts the Q (resonance) of the low-pass filter. At 0%, the Q is set to the Butterworth value (0.707) for a flat roll-off. Higher values add a subtle resonant peak at the cutoff frequency, which can add a sense of "air" or presence to the high end. Default: 50%. ローパスフィルターの Q(レゾナンス)を調整します。0% では Butterworth 値(0.707)に設定されフラットなロールオフになります。高い値ではカットオフ周波数付近に微妙なレゾナントピークが加わり、高域に「空気感」や存在感を与えます。デフォルト: 50%。
Selects the LPF cutoff frequency. The available range depends on the session sample rate — at 44.1/48 kHz the maximum is 18.98 kHz, at 88.2/96 kHz up to 37.95 kHz, and at 176.4/192 kHz up to 75.90 kHz. Lower cutoff values produce a warmer, darker tone by rolling off more high-frequency content. LPF のカットオフ周波数を選択します。利用可能な範囲はセッションのサンプルレートに依存します — 44.1/48 kHz 時は最大 18.98 kHz、88.2/96 kHz 時は最大 37.95 kHz、176.4/192 kHz 時は最大 75.90 kHz です。低いカットオフ値はより多くの高域成分をロールオフし、より温かく暗いトーンを生み出します。
The On/Off switch for the low-pass filter described in this chapter. It operates independently of Tube Bypass. Base cutoff approximately 18.97 kHz (adjustable via LPF Scale), applied post-downsample at the session sample rate. 本章で説明している LPF 全体の On/Off スイッチです。Tube Bypass とは独立して動作します。基本カットオフは約 18.97 kHz(LPF Scale で調整可能)で、ダウンサンプル後にセッションサンプルレートで適用されます。
⑧ Clipper
Sets the drive amount pushing the signal into the clipper. Knob color changes with gain reduction amount. Hover or click to reveal the Ceiling knob. When calibrated with Compensate Gain, additional headroom is created before the clipper threshold, allowing more drive to be applied. 信号をクリッパーに押し込むドライブ量を設定します。ノブの色はゲインリダクション量に応じて変化します。マウスホバーまたはクリックで Ceiling ノブが表示されます。Compensate Gain でキャリブレーションを行うと、クリッパー閾値までのヘッドルームが確保され、より多くのドライブを加えることができます。
Morphs the clipper character from soft saturation to hard clipping. クリッパーのキャラクターをソフトサチュレーションからハードクリッピングへ変化させます。
Adjusts the positive/negative asymmetry of the clipper. Increasing this enhances even-order harmonics (H2, H4). クリッパーの正負非対称性を調整します。上げると偶数次倍音(H2, H4)が増加します。
Switches the clipper position. Pre (default): Clipper before HPF. Post: HPF before Clipper (Post HPF also functions as a DC cut for the clipper). クリッパーの位置を切り替えます。Pre(デフォルト): クリッパーが HPF の前。Post: HPF がクリッパーの前(Post: HPF はクリッパーのための DC カットとしても機能します。)。
Real-time harmonic analysis (H2–H5) of the clipper output. Shows the harmonic balance at the current Character and Symmetry settings. クリッパー出力のリアルタイム高調波分析(H2–H5)。現在の Character と Symmetry 設定での高調波バランスを表示します。
⑯ Top Bar & Presets

The top bar provides quick access to all global controls. From left to right: Master Bypass, Polarity Invert, Undo/Redo, Preset selector, Save/Load, A/B comparison with Copy, Model Mode selector (Standard / Hybrid / Professional), Sub LPF, Oversampling rate, Help overlay, and Settings. トップバーからすべてのグローバルコントロールにアクセスできます。左から: Master Bypass、極性反転(Polarity Invert)、Undo/Redo、プリセット選択、Save/Load、A/B 比較と Copy、モデルモード選択(Standard / Hybrid / Professional)、Sub LPF、オーバーサンプリング率、ヘルプオーバーレイ、設定。
Bypasses the entire plugin processing chain. The input signal passes through unprocessed. プラグイン全体の処理をバイパスします。入力信号がそのまま出力されます。
Inverts the polarity (phase) of the input signal by multiplying all samples by -1. This is applied before all processing stages. Useful for phase alignment when using this plugin in parallel with a dry signal or other processing chains, or for correcting sources that were captured with inverted polarity due to wiring or microphone placement. Note: this is a true polarity inversion, not a phase shift — it does not introduce any latency or frequency-dependent phase changes. 入力信号の極性(位相)を反転します(全サンプルに -1 を乗算)。すべての処理ステージの前段で適用されます。ドライ信号や他の処理チェインとパラレルで使用する際の位相合わせや、配線やマイクの配置により逆極性でキャプチャされたソースの補正に使用します。注意: これは真の極性反転であり、位相シフトではありません。レイテンシーの追加や周波数依存の位相変化は発生しません。
Undoes or redoes the last parameter change. 直前のパラメータ変更を元に戻す、またはやり直します。
Selects a factory or user preset. The preset you choose is loaded into the slot you are currently viewing (A or B). Overwriting 'User Default.nkpd' sets the startup preset for future sessions. ファクトリーまたはユーザープリセットを選択します。選んだプリセットは、そのとき表示している面(A / B)に読み込まれます。'User Default.nkpd' を上書き保存すると、次回起動時以降のデフォルト設定になります。
Saves the current settings as a user preset, or loads a preset from a file. What is saved — and where a loaded preset goes — is the slot you are currently viewing: A while on A, B while on B. To compare A against B, save each side as its own preset and recall them individually. 現在の設定をユーザープリセットとして保存、またはファイルからプリセットを読み込みます。保存されるのも、読み込み先も、そのとき表示している面です(A を表示中なら A、B を表示中なら B)。A と B を比べたい場合は、それぞれの面を別々のプリセットとして保存し、別々に呼び出してください。
Switches between Preset A and Preset B for instant comparison. A and B hold independent settings. Copy duplicates the active preset to the other slot. プリセット A と B を切り替えて即座に比較できます。A と B はそれぞれ独立した設定を持ちます。Copy で現在のプリセットをもう一方のスロットにコピーします。
Switches the processing model. Standard: lowest CPU. Hybrid family: moderate CPU. Professional family: highest CPU. The factory default mode is Hybrid-. Re-clicking the Hybrid segment cycles through the Hybrid family (Hybrid- ⇄ Hybrid; Hybrid+ joins the cycle when Secret Mode is enabled in Settings). Re-clicking the Professional segment cycles through the Professional family (Professional+ and Extreme join the cycle when Secret Mode is enabled). Higher modes offer greater accuracy at the cost of increased CPU usage. 処理モデルを切り替えます。Standard: 最低 CPU。Hybrid 系: 中程度の CPU。Professional 系: 最高 CPU。工場出荷時の既定モードは Hybrid- です。Hybrid セグメントを再クリックすると Hybrid 系を巡回します(Hybrid- ⇄ Hybrid。Settings の Secret Mode 有効時は Hybrid+ も巡回に加わります)。Professional セグメントを再クリックすると Professional 系を巡回します(Secret Mode 有効時は Professional+ と Extreme が加わります)。上位モードほど精度が向上しますが、CPU 使用量が増加します。
Sets the oversampling rate (1x / 2x / 4x). Higher values reduce aliasing at the cost of increased CPU and latency. Left-click cycles forward (1x → 2x → 4x), right-click or Ctrl+click cycles backward. Latency is kept constant when switching between 2x and 4x for seamless hot-swap. The Clipper and Standard mode's Tube/Trans stages use ADAA (Antiderivative Anti-Aliasing) at 2x/4x for high-quality nonlinear processing. オーバーサンプリング率を設定します(1x / 2x / 4x)。高い値ほどエイリアシングが低減されますが、CPU 負荷とレイテンシーが増加します。左クリックで順方向(1x → 2x → 4x)、右クリックまたは Ctrl+クリックで逆方向に切り替えます。2x と 4x の切り替え時もレイテンシーが一定に保たれシームレスなホットスワップが可能です。Clipper と Standard モードの Tube/Trans ステージは 2x/4x 時に ADAA(逆導関数アンチエイリアシング)を使用し、高品質な非線形処理を行います。
Bypass & Link Controls
The bottom row of the plugin UI contains independent Bypass and Link toggles for each processing section. These dual-segment toggles allow you to isolate individual stages of the signal chain for precise A/B comparison, troubleshooting, or creative sound design. Seven Bypass/Link pairs are exposed: Tube, Transformer, Clipper, Low Shelf, High Shelf, HPF (Trans HPF), and LPF (Tube LPF). The Expansion section has no Bypass button — use right-click mute on its knobs instead. プラグイン UI の最下段には、各処理セクションごとに独立した Bypass と Link のトグルが配置されています。このデュアルセグメントトグルにより、信号チェインの個別ステージを分離して、精密な A/B 比較、トラブルシューティング、クリエイティブなサウンドデザインが可能です。UI に露出するのは 7 組: Tube、Transformer、Clipper、Low Shelf、High Shelf、HPF(Trans HPF)、LPF(Tube LPF)。Expansion セクションには Bypass ボタンがありません(右クリックミュートで代替してください)。
Bypasses a single processing section. The bypassed section is completely removed from the signal chain while all other sections remain active. This is useful for isolating the effect of a specific stage — for example, bypassing only the Clipper to hear the difference it makes, or bypassing the Tube to evaluate the Transformer's contribution alone. DAW latency compensation remains constant regardless of bypass state. 単一の処理セクションをバイパスします。バイパスされたセクションは信号経路から完全に除外され、他のセクションは引き続き動作します。特定のステージの効果を分離して確認するのに便利です。例えば、Clipper だけをバイパスしてその違いを聴いたり、Tube をバイパスして Transformer 単体の寄与を評価したりできます。バイパスの状態に関わらず、DAW のレイテンシー補正は一定に保たれます。
Links a section to the Bypass Linked button in the Input section (above the Input Trim column). When Bypass Linked is activated, all linked sections are bypassed simultaneously. セクションを Input セクション(Input Trim 列の上)の Bypass Linked ボタンに連動させます。Bypass Linked を有効にすると、Link されたすべてのセクションが同時にバイパスされます。
The expandable Row 2 sub-knobs (Analog Expansion, Fluctuation, Hysteresis, Bloom, Clip Character, Clip Symmetry) support right-click muting. Right-clicking on any of these knobs instantly mutes that specific parameter without affecting the parent section's bypass state. 展開可能な Row 2 のサブノブ(Analog Expansion、Fluctuation、Hysteresis、Bloom、Clip Character、Clip Symmetry)は右クリックミュートに対応しています。これらのノブを右クリックすると、親セクションのバイパス状態に影響を与えずに、そのパラメータだけを瞬時にミュートできます。
Footer Bar

The footer bar displays real-time status information. From left to right: Home button, producer name, Clipper Ceiling with gain reduction, Dry/Wet mix ratio, CPU usage, and license status. フッターバーにはリアルタイムのステータス情報が表示されます。左から: Home ボタン、プロデューサー名、クリッパー Ceiling とゲインリダクション、Dry/Wet ミックス比率、CPU 使用率、ライセンス状態。
Displays the current clipper ceiling level and gain reduction amount. The box border color changes based on the gain reduction intensity. Left-click opens the Ceiling overlay for direct value editing. Grayed out when the clipper is bypassed. 現在のクリッパー Ceiling レベルとゲインリダクション量を表示します。ボックスの枠色はゲインリダクション量に応じて変化します。左クリックで Ceiling オーバーレイが開き、値を直接編集できます。クリッパーがバイパス時はグレーアウトされます。
Displays the current dry/wet mix ratio. Left-click opens the Dry/Wet overlay for direct value editing. Right-click disables the Dry/Wet control, returning the plugin to full-wet (100% Wet) operation. The box border color reflects the current mix balance. 現在の Dry/Wet ミックス比率を表示します。左クリックで Dry/Wet オーバーレイが開き、値を直接編集できます。右クリックで Dry/Wet コントロールを無効化し、フルウェット(100% Wet)動作に戻します。ボックスの枠色は現在のミックスバランスを反映します。
Displays the current CPU usage as a percentage with a bar indicator. The bar color follows the same gradient as the knobs (blue → yellow → red) based on the load level. 現在の CPU 使用率をパーセンテージとバーインジケーターで表示します。バーの色はノブと同じグラデーション(青 → 黄 → 赤)で負荷レベルに応じて変化します。
Displays the current license status: Demo (unlicensed — audio plays with a periodic interruption: noise burst or silence, selectable in Settings; unlimited), Trial: N days (14-day Full Trial, clean), Licensed (purchased, clean), Offline Mode (purchased license working offline within its 90-day grace period), Invalid Key (rejected key). Click it any time to start a trial, enter a key, or manage an existing license. 現在のライセンス状態を表示します: Demo(ライセンスなし — 音は出るが定期的に中断が入る。ノイズ/無音を設定で選択、無制限)、Trial: N days(14 日間の Full Trial、クリーン)、Licensed(購入版、クリーン)、Offline Mode(購入ライセンスが 90 日の猶予内でオフライン動作中)、Invalid Key(拒否されたキー)。クリックするといつでもトライアル開始・キー入力・既存ライセンスの管理ができます。
Utility & Settings
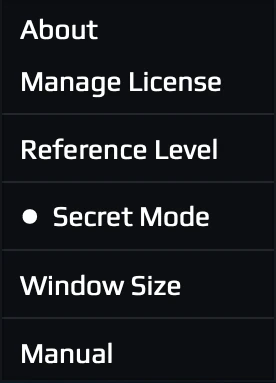
Opens the settings menu (gear icon, top-right). Contains the following items: 設定メニューを開きます(右上の歯車アイコン)。以下の項目が含まれます:
Shown at the very top of the menu only when a newer version has been detected. Click to open the download page. 新バージョン検出時のみ、メニュー最上段に表示されます。クリックでダウンロードページを開きます。
Displays plugin version information, build number, and credits. プラグインのバージョン情報、ビルド番号、クレジットを表示します。
If you activate with Offline Activation, the plugin will never communicate with the server — permanently.
Opens the license window. The current mode is always shown by the license status in the footer — click it any time to start a trial, enter a key, or manage a license. ALA-101 always plays; a license only removes the Demo noise. The modes are:
Demo — the default when no license is present. The plugin is fully functional and unlimited, with every parameter available, but every 60 seconds the output is briefly interrupted. In the Settings (gear) menu you can choose how it is interrupted — a short noise burst, or a moment of silence. It needs no account and no internet — just install and evaluate for as long as you like. Start a Full Trial or activate a license to remove the interruption.
Full Trial — a free 14-day evaluation of the complete, clean plugin (no noise). It requires a free account and one online activation. After you activate once, the trial runs fully offline for the remaining 14 days. A trial can be used on one computer. When the 14 days end, the plugin simply returns to Demo mode — nothing is lost.
Licensed — a purchased license: permanent and clean. Activate it the same way as a trial: online (paste your key and click Activate), or offline (open Offline, copy your Machine ID, enter your key + Machine ID at nk-productions.net from another device, and paste back the response code). Offline activation is for purchased licenses only. Deactivate a license to free it and move it to another computer.
Offline Mode — a purchased license checks in with the server from time to time. If your computer happens to be offline at that moment, the plugin does not lock you out: it keeps running fully, showing "Offline Mode", for up to 90 days after its last successful check. Connect to the internet once within that window and it silently re-verifies, returns to "Licensed", and resets the 90-day allowance. This lets you work offline for long stretches (tours, studios with no internet) without interruption. Offline Mode applies to purchased licenses only — a Full Trial always enforces its 14-day limit, even offline.
Invalid Key — the key you entered was rejected by the server. Check that the key is correct, is for ALA-101, and has an available activation (deactivate it on another machine first if needed), then try again.
Offline Activation を行った場合、プラグインは恒久的にサーバーと通信することはありません。
ライセンス画面を開きます。現在のモードは常にフッターのライセンスステータスに表示され、クリックするといつでもトライアル開始・キー入力・ライセンス管理ができます。ALA-101 は常に音が出ます — ライセンスは Demo のノイズを取り除くだけです。モードは以下のとおりです:
Demo — ライセンスがないときの既定モード。全パラメーターが使え、全機能・無制限で動作しますが、60 秒ごとに出力が短く中断されます。中断の種類は設定(歯車)メニューで選べます — 短いノイズ、または一瞬の無音です。アカウントもインターネットも不要で、インストールすればいつまででも評価できます。Full Trial を開始するかライセンスをアクティベートすると中断が消えます。
Full Trial — 製品版のクリーンな(ノイズなし)状態を試せる無料の 14 日間評価。無料アカウントと 1 回のオンラインアクティベーションが必要です。一度アクティベートすれば、残りの 14 日間は完全オフラインで使えます。トライアルは 1 台のコンピューターで使用できます。14 日が終わると Demo モードに戻るだけで、何も失われません。
Licensed — 購入したライセンス。恒久・クリーンです。トライアルと同じ方法でアクティベートします: オンライン(キーを貼り付けて Activate)、またはオフライン(Offline を開いて Machine ID をコピーし、別のデバイスで nk-productions.net にキー + Machine ID を入力、返ってきたレスポンスコードを貼り付け)。オフラインアクティベーションは購入版専用です。デアクティベートするとライセンスが解放され、別のコンピューターへ移せます。
Offline Mode — 購入ライセンスは時々サーバーに接続して検証します。その瞬間にコンピューターがオフラインでも、プラグインはロックされず、最後に検証が成功してから最大 90 日間は「Offline Mode」表示のままフル機能で動作し続けます。その 90 日以内に一度でもインターネットに接続すれば、自動で再検証されて「Licensed」に戻り、90 日の猶予がリセットされます。これにより、ツアー中やインターネットのないスタジオなど、長期間オフラインでも中断なく作業できます。Offline Mode は購入ライセンス専用で、Full Trial はオフラインでも必ず 14 日の期限を厳格に適用します。
Invalid Key — 入力したキーがサーバーに拒否されました。キーが正しいか、ALA-101 用か、アクティベーション枠が空いているか(必要なら別のマシンで先にデアクティベート)を確認して、もう一度お試しください。
Sets the reference level calibration: +4 dBu = -18 dBFS (default, broadcast/professional standard) or +4 dBu = -20 dBFS (EBU/mastering standard). This determines the internal gain staging for the neural network models — the plugin delivers its highest accuracy at the reference level. The RMS meter and Compensate Gain button are calibrated to this setting. リファレンスレベルのキャリブレーションを設定します: +4 dBu = -18 dBFS(デフォルト、放送/プロフェッショナル標準)または +4 dBu = -20 dBFS(EBU/マスタリング標準)。この設定はニューラルネットワークモデルの内部ゲインステージングを決定し、プラグインはリファレンスレベルで最高精度を発揮します。RMS メーターと Compensate Gain ボタンもこの設定に連動します。
When enabled (dot indicator lit), you can adjust plugin parameters while the Master Bypass is active. Changes are applied silently and take effect when bypass is disengaged. When disabled, parameter edits are blocked during bypass to prevent accidental changes. 有効時(ドットインジケーター点灯)、Master Bypass が有効な状態でもプラグインのパラメータを調整できます。変更はサイレントに適用され、バイパス解除時に反映されます。無効時はバイパス中のパラメータ編集がブロックされ、意図しない変更を防止します。
Shown only while running in Demo mode (hidden once licensed). Selects how the periodic Demo interruption sounds: Noise Burst (a short noise) or Silent (a brief dropout). Demo モードで動作している間のみ表示されます(ライセンス済みでは非表示)。Demo の定期的な中断の種類を選択します: Noise Burst(短いノイズ)または Silent(一瞬の無音)。
When enabled (dot indicator lit), unlocks additional processing modes beyond the standard ones. These extended modes provide higher-quality neural network models at the cost of increased CPU usage. Re-click the Hybrid segment to add Hybrid+ to the Hybrid-family cycle, and re-click the Professional segment to add Professional+ and Extreme to the Professional-family cycle. Secret Mode state is saved with presets. 有効時(ドットインジケーター点灯)、標準モードに加えて追加の処理モードがアンロックされます。拡張モードはより高品質なニューラルネットワークモデルを提供しますが、CPU 使用量が増加します。Hybrid セグメントを再クリックすると Hybrid+ が Hybrid 系の巡回に、Professional セグメントを再クリックすると Professional+ と Extreme が Professional 系の巡回に加わります。Secret Mode の状態はプリセットに保存されます。
When enabled (dot indicator lit), the Symmetry control applies asymmetry via the clipper's gain staging instead of the clipping ceiling. In normal mode (off), the Symmetry control only affects the clipping ceiling. This setting is saved with the session (it is not included in presets). 有効時(ドットインジケーター点灯)、Symmetry がクリッピングの天井ではなくクリッパーのゲインステージングに非対称性を適用します。通常モード(オフ)では Symmetry はクリッピングの天井のみに作用します。この設定はセッションに保存されます(プリセットには含まれません)。
When enabled (dot indicator lit), the value display below each knob stays visible after the mouse leaves — it remains until you hover over another knob. Double-click the value label to type in a precise numeric value. Press Enter to confirm or Escape to cancel. This setting is saved with the session (it is not included in presets). 有効時(ドットインジケーター点灯)、各ノブ下の数値表示がマウスを離しても表示され続けます(別のノブにホバーするまで保持)。数値ラベルをダブルクリックすると、正確な数値を直接入力できます。Enter で確定、Escape でキャンセルします。この設定はセッションに保存されます(プリセットには含まれません)。
Configures automatic quality upgrades during offline bounce (export/render). The default is Match Realtime (no model override; Auto 4x Oversampling off), and these options only take effect during non-realtime processing. Auto 4x Oversampling forces 4x oversampling regardless of the current setting. Model override options: Hybrid-, Hybrid, Hybrid+, Professional, Professional+, and Extreme — each replaces the current model with the selected neural network model during bounce. For example, you can use Standard mode for real-time playback and automatically switch to Extreme for the final render. Model options are mutually exclusive; oversampling can be combined with any model option. オフラインバウンス(書き出し/レンダリング)時の自動品質アップグレードを設定します。既定は Match Realtime(モデルオーバーライドなし・Auto 4x Oversampling オフ)で、これらのオプションは非リアルタイム処理時のみ有効です。Auto 4x Oversampling は現在の設定に関係なく 4x オーバーサンプリングを強制します。モデルオーバーライドオプション: Hybrid-、Hybrid、Hybrid+、Professional、Professional+、Extreme — バウンス時に現在のモデルを選択したニューラルネットワークモデルに置き換えます。例えば、リアルタイム再生では Standard モードを使用し、最終レンダリングでは自動的に Extreme に切り替えることができます。モデルオプションは排他的で、オーバーサンプリングは任意のモデルオプションと組み合わせ可能です。
Adjusts the plugin window scale. The UI is fully resizable and supports Retina / HiDPI displays. The selected scale is saved with the session and is also stored in user presets (including User Default). プラグインウィンドウのスケールを調整します。UI は完全にリサイズ可能で、Retina / HiDPI ディスプレイに対応しています。選択したスケールはセッションおよびユーザープリセット(User Default 含む)に保存されます。
Opens the online manual in your default web browser. デフォルトの Web ブラウザでオンラインマニュアルを開きます。
Toggles the help overlay. When enabled, hovering over any control displays a description. ヘルプオーバーレイの表示を切り替えます。有効時、各コントロールにマウスを合わせると説明が表示されます。
Manages license activation and validation. Without a license the plugin runs in Demo mode (unlimited, with a periodic interruption — noise burst or silence, selectable in Settings); a free 14-day Full Trial or a purchased license removes it. Enter your license key to activate. ライセンスのアクティベーションと検証を管理します。ライセンスがない状態では Demo モード(無制限・定期的な中断入り。ノイズ/無音を設定で選択)で動作し、無料の 14 日間 Full Trial または購入ライセンスで中断が取り除かれます。ライセンスキーを入力してアクティベートしてください。
GPU
GPU processing is in beta testing. The beta build is available from the Download page. GPU 処理はベータテストです。ベータ版は Download ページから入手可能です。
A high sample rate combined with a small buffer leaves very little time to process each block — at 192 kHz with 64 samples, about 0.33 ms. If the work cannot finish within that window the audio will not come out in time. This is not a fault in the plug-in; it is a physical limit set by the time the computation and the data transfer require. Increase the buffer size or lower the sample rate. 高いサンプルレートと小さいバッファサイズを組み合わせると、1 ブロックあたりに使える時間が極端に短くなります。たとえば 192 kHz・64 サンプルでは約 0.33 ミリ秒です。この時間内に処理を終えられない場合、音が間に合いません。これはプラグインの不具合ではなく、計算とデータ転送に必要な時間による物理的な制約です。バッファサイズを大きくするか、サンプルレートを下げてください。
Diagnostic Log
While GPU processing is in use the plug-in writes a diagnostic log. If you run into a problem, sending it to Support is the fastest way to identify the cause. GPU 処理の使用中、プラグインは診断ログを書き出しています。問題が起きたときは、これをサポートへお送りいただくのが原因を特定する一番早い方法です。
macOS — ~/Library/NK Productions/ALA-101/Logs/ALA101_diag_*.csv (in Finder, use Go > Go to Folder and paste ~/Library/NK Productions)
Windows — %APPDATA%\NK Productions\ALA-101\Logs\ALA101_diag_*.csv (paste %APPDATA%\NK Productions into the Explorer address bar)
macOS — ~/Library/NK Productions/ALA-101/Logs/ALA101_diag_*.csv(Finder の「移動 > フォルダへ移動」に ~/Library/NK Productions を入力)
Windows — %APPDATA%\NK Productions\ALA-101\Logs\ALA101_diag_*.csv(エクスプローラーのアドレス欄に %APPDATA%\NK Productions を入力)
1. Reproduce the problem, then quit the DAW — the last entries are written on exit.
2. Open the folder above and take every ALA101_diag_*.csv in it.
3. Send them through the Support page, with the name of your DAW, your sample rate and buffer size.
1. 問題を再現させたあと、DAW を終了してください。最後の記録は終了時に書き出されます。
2. 上のフォルダを開き、中の ALA101_diag_*.csv をすべて取り出してください。
3. サポートページ(メールフォーム)から、DAW 名・サンプルレート・バッファサイズを添えてお送りください。