初めにお読みください
※ 現在 macOS の AU / VST3 / AAX、Windows の VST3 のみ。 処理負荷が高いプラグインのため、トライアルで正常動作するか確認してからご購入をオススメ致します。また、あたらしい設計のためいくつか注意以降があります。
ダウンロードはこちら。
Currently available for macOS (AU / VST3 / AAX) and Windows (VST3 only). Due to the high processing demands of this plugin, we recommend verifying proper operation with the trial version before purchasing. Also, there are a few things to note because this is a new design.
Download here.
動作環境について
このプラグインは些細な変化しか基本的に与えません。アナログ機器の動的動作にフォーカスしたプロ向けのプラグインです。一般的なプラグインとは違い、変化が非常に微細で ON/OFF での違いを聴き取り、比較検討するプラグインです。もちろん、派手な音色変化を実行するための Option 機能が備わっていますので、使い方を一度お読みいただいてからプラグインを触ってみてください。
プラグイン起動直後、または再生をストップした時や Loop 再生時、モデルをチェンジした際にノイズをプラグインが出力することがあります。これはプラグインの設計上のアーティファクト (動的動作の残留) で、再生中やバウンス時には影響がないものです。
Please Read Before You Begin
This plugin produces only subtle changes by design. It is a professional-grade tool focused on the dynamic behavior of analog equipment. Unlike conventional plugins, the differences are extremely fine — this is a plugin meant to be evaluated by carefully listening to the ON/OFF comparison. Of course, option features are available for more dramatic tonal changes, so we recommend reading through the usage guide before getting started.
You may encounter momentary noise artifacts when initializing the plugin, stopping the transport, Loop playback or changing models. These are inherent to the plugin’s dynamic processing design and will not be present in your processed audio or final renders.
本製品は Apple Silicon/SIMD 向けに最適化されています。
macOS に於いては Apple Silicon 以外でのコンピュータでも動作いたしますが、サポート対象外となります。Rosetta2 環境でも動作確認はしておりますが、通常よりも処理負荷が高くなります。
Windows PC に於いては SIMD に対応していない CPU では動作致しません。ご了承ください。また、特定の DAW と GPU の組み合わせでパフォーマンスが著しく低下、もしくはクラッシュする可能性があります。これは DAW のアップデートと GPU のドライバーのアップデート対応が必須になります。ご了承ください。GPU や CPU が原因で正常動作しない場合はこちらの機能で問題が解決する場合があります。
This product is optimized for Apple Silicon and SIMD-capable hardware.
It may function on non-Apple Silicon computers on macOS, but such configurations are not officially supported. While we have confirmed that it works in a Rosetta2 environment.
On Windows, CPUs without SIMD support are not compatible and cannot run the plugin. Additionally, certain combinations of DAW and GPU may result in significantly degraded performance or crashes. Updating both your DAW and GPU drivers is required to resolve such issues. Please be aware of this limitation. If you experience issues related to your GPU or CPU, switching between these modes may resolve the problem.
1. Windows の「ハードウェア アクセラレータ GPU スケジューリング」をオフにする
Windows 10/11 の比較的新しい機能ですが、これが原因でDAWの描画やオーディオエンジンに干渉し、プラグインのGUI表示時にクラッシュを誘発することがあります。
-
設定手順:
-
[設定] > [システム] > [ディスプレイ] > [グラフィックス] を開く。
-
「既定のグラフィックス設定を変更する」 をクリック。
-
「ハードウェア アクセラレータ GPU スケジューリング」 を オフ にする。
-
PCを再起動する。
-
2. NVIDIA/AMD のコントロールパネルで「高パフォーマンス」を避ける
ノートPCなどのマルチGPU環境(CPU内蔵 + 外部GPU)の場合、外部GPU(NVIDIA/AMD)がDAWのGUI描画に介入しようとして、ドライバーのバグを踏むことがあります。
-
NVIDIA の場合:
-
[NVIDIA コントロールパネル] > [3D 設定の管理] > [プログラム設定] で、使用している DAW の実行ファイル(.exe) を選択。
-
「優先するグラフィックスプロセッサ」を 「統合型グラフィックス」 に強制変更してみる。
-
あるいは、「垂直同期」などの高度な3D機能をそのDAWに対してのみオフにする。
-
3. アプリケーション(DAW)側の設定で GPU 加速を止める
一部のDAW(Ableton Live や Studio One など)自体に GPU レンダリングを無効化するオプションがある場合があります。
-
DAW側の設定を確認: DAWの「環境設定」>「表示/ビデオ」項目に「ハードウェアアクセラレーションを使用する」
4. 電源プランの変更
GPU の省電力機能(クロックの急激な変動)がオーディオ処理に割り込み、ドライバレベルでクラッシュを引き起こすことがあります。
-
手順: [コントロールパネル] > [電源オプション] で 「高パフォーマンス」 または 「究極のパフォーマンス」 を選択し、GPUが常に安定したクロックで動作するようにします。
1. Disable “Hardware-Accelerated GPU Scheduling” on Windows
This is a relatively recent feature in Windows 10/11 that can interfere with DAW rendering and the audio engine, potentially causing crashes when a plugin GUI is displayed.
Steps:
– Open Settings > System > Display > Graphics.
– Click “Change default graphics settings”.
– Turn “Hardware-Accelerated GPU Scheduling” Off.
– Restart your PC.
2. Avoid “High Performance” mode in the NVIDIA/AMD Control Panel
On laptops or multi-GPU systems (integrated + discrete GPU), the discrete GPU (NVIDIA/AMD) may attempt to handle DAW GUI rendering and trigger driver bugs in the process.
For NVIDIA:
– Open NVIDIA Control Panel > Manage 3D Settings > Program Settings and select your DAW executable (.exe).
– Force “Preferred graphics processor” to “Integrated graphics”.
– Alternatively, disable advanced 3D features such as “Vertical Sync” for that DAW only.
3. Disable GPU Acceleration in the DAW
Some DAWs (such as Ableton Live and Studio One) include an option to disable GPU rendering directly within the application. Check your DAW’s preferences: Preferences > Display / Video, and look for an option such as “Use hardware acceleration” and disable it.
4. Change the Power Plan
GPU power-saving features (aggressive clock frequency fluctuations) can interrupt audio processing and cause driver-level crashes.
Steps: Open Control Panel > Power Options and select “High Performance” or “Ultimate Performance” to ensure the GPU operates at a stable clock frequency at all times.
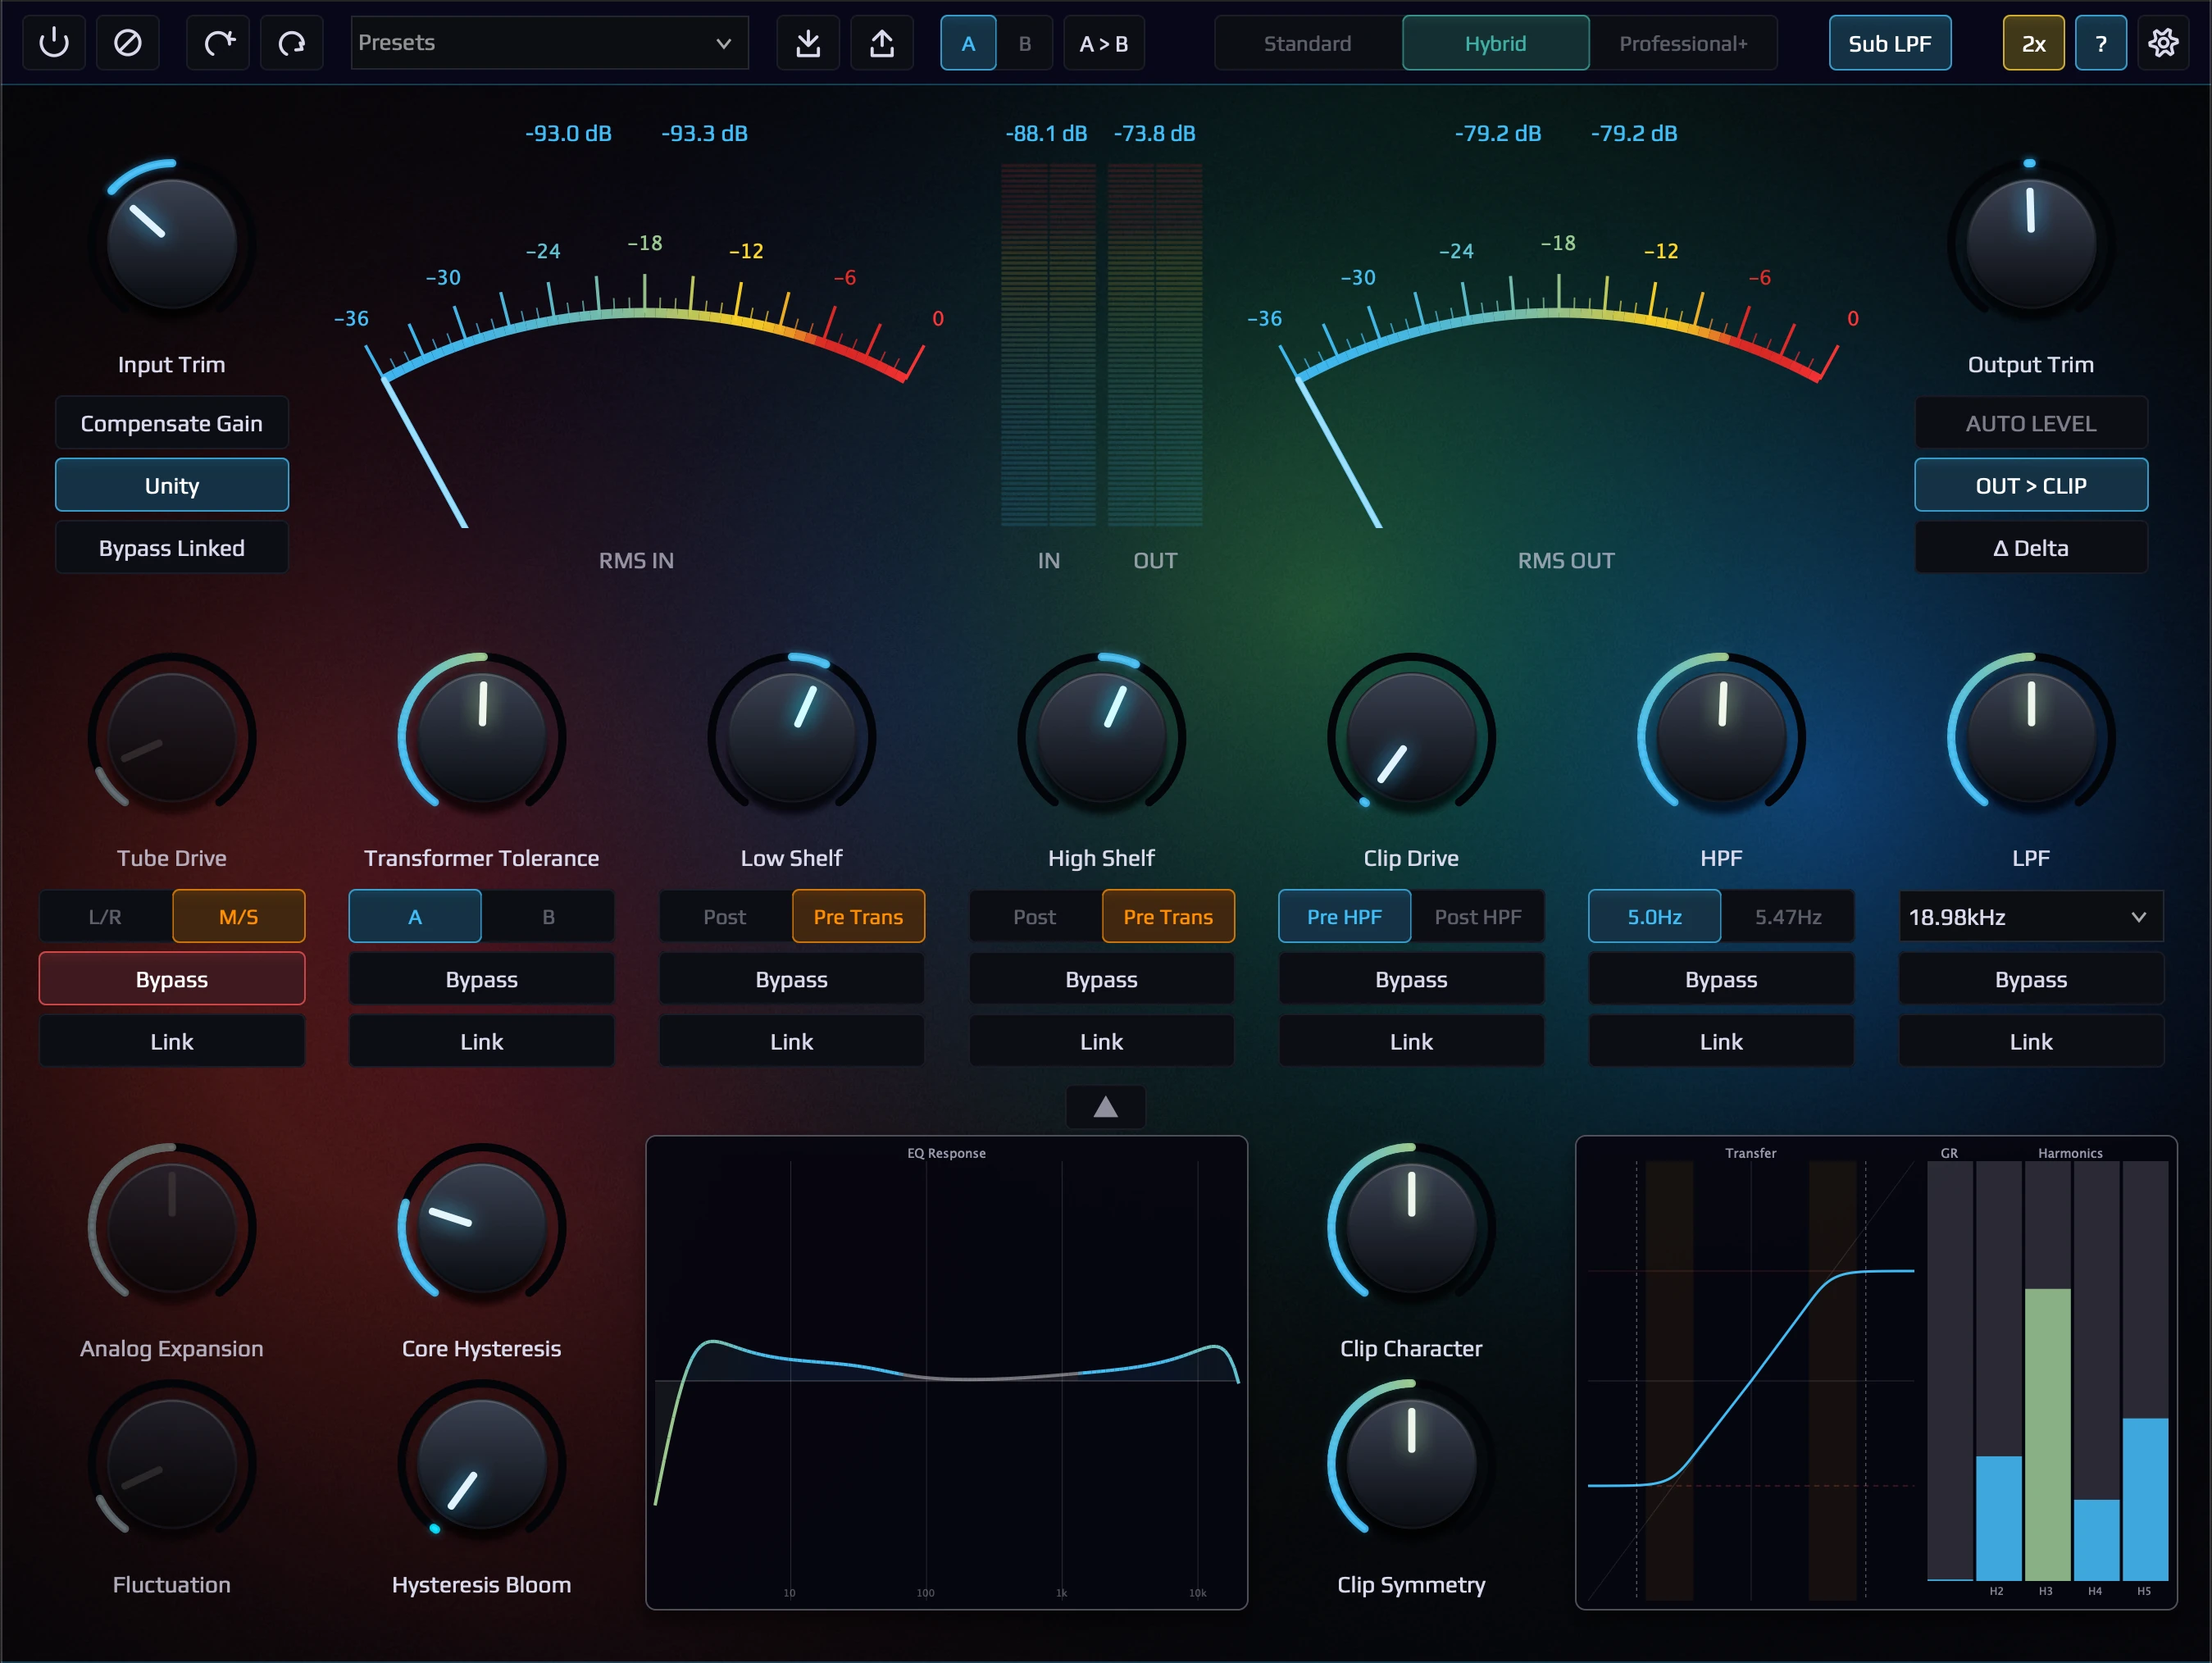
おそらく世界初のネイティブ日本語表記に対応したオーディオプラグイン (ヘルプ表示が日本語で見れます。)
Bypass とボタン、ツマミ設計のこだわり
すべての変化ノブに Bypass ボタンと Bypass Link ボタンを実装しました。従来のプラグインは各パラメータごとに指定した Bypass 機能がありません。この機能を利用することで、どのツマミでどんな変化が起きているのか比較しやすくなりました。この ALA-101 Hybridization は基本的に非常に小さな違いをもたらすプラグインのため、集中して何度も Bypass と Engage を繰り返すための設計にこだわりました。
とくに Bypass Link ボタンは複数のノブの On / Off をリンクさせて実行できます。一押し機能です。
また、通常 A / B などのボタンはクリックするためにマウス操作が必要ですが、どちらかのボタンを押せば切り替えが可能です。目をつぶった状態でマウスクリックするだけで設定の切り替えが可能です。このプラグインには必須の機能です。もちろん Preset A /B 機能もあり、これもトグル仕様の切り替えボタンになっています。活用してください。
もちろん、パラメータツマミ、Knob (ノブ) 設計もこだわっています。ツマミに 青い領域、黄色い領域、赤い領域 が描画されているツマミは青が安全領域、黄色が注意領域〜危険領域に推移、赤が危険領域〜想定外領域、というようなことを示しています。できるだけ青い範囲でご利用ください。もちろん、黄色や赤い領域でも使用して構いません。
Bypass Buttons & Knob Design Philosophy
Every processing knob has its own Bypass and Bypass Link buttons. Unlike conventional plugins, which lack per-parameter bypass functionality, this design makes it easy to compare exactly what each knob is doing. Since ALA-101 Hybridization produces very subtle differences by nature, the interface was carefully designed for focused, repeated bypass/engage comparison.
The Bypass Link button is especially powerful — it lets you link multiple knobs together and toggle them all on/off at once. A must-use feature. Additionally, the A/B buttons are designed as toggles — simply clicking either button switches the state. You can switch settings with a single mouse click, even with your eyes closed. This is an essential feature for this plugin. The Preset A/B function works the same way — a single toggle button for instant comparison. Make full use of it.
The parameter knobs are also designed with intention. Knobs displaying colored arc regions indicate operating zones: blue is the safe range, yellow transitions from caution to warning, and red indicates the warning to extreme range. We recommend staying within the blue range whenever possible — though of course, yellow and red are perfectly usable as well.
Gain Staging が必須です
このプラグインは本物のプロオーディオ機器を模倣しており、入力レベルに酷く依存する設計です、つまりゲインステージングが必須のプラグインです。入力レベルに応じて動的に音色変化が得られるプラグインのため、基本的に入力レベルは Input Meter の -18dB を下回るように信号を入力してください。(-18dBFS = +4dBu でキャリブレーション)
Input Trim が -24dB できますが、信号レベル (RMS) がそもそも大きい信号を入力したい場合は DAW の機能 (Clip Gain など) でプラグインに入力される前段階で信号レベルを下げてください。
もちろんオーバーしても構いませんが、音が飽和領域に近いため、派手に聴こえますがダイナミクスの領域で時間変化の挙動が見えにくくなる場合があります。それも音作りの一つです。Unity のボタンを有効にして信号を突っ込んだり引っ込んだり (Hot/Cold) を試してみてください。
音色の変化を十分に吟味するために AUTO-LEVEL ボタンを活用してください。Loudness 測定を実装しました。入力されるレベルに対して Loudness を Match させに行くため、Main の Bypass ボタンを押して、ご自身が設定したパラメータと Bypass で吟味してください。(このプラグインは誰でも簡単に最高品質をお届けするようなプラグインではありません。Bypass と Engage で些細な変化を吟味してください。)
Gain Staging is Essential
This plugin faithfully emulates real professional analog equipment, and its behavior is highly dependent on input level — meaning gain staging is essential. The plugin responds dynamically to input level, so as a general rule, keep the input signal below -18 dB on the Input Meter. (Calibrated at -18 dBFS = +4 dBu.)
The Input Trim allows up to -24 dB of adjustment, but if the source signal (RMS) is inherently loud, reduce the level before the plugin using your DAW’s features (such as Clip Gain).
Driving the input harder is perfectly fine, but since the signal enters the saturation region, it may sound more dramatic while making time-varying dynamic behavior harder to perceive. This is a valid creative choice in itself. Try enabling the Unity button and experimenting with pushing the signal hotter or pulling it back (Hot/Cold).
To thoroughly evaluate tonal changes, make use of the AUTO-LEVEL button. We have implemented loudness measurement — it matches the output loudness to the input level, so you can press the main Bypass button and compare your parameter settings against the bypassed signal. (This plugin is not designed to deliver instant, effortless results for everyone. Take your time to compare the subtle differences between Bypass and Engage.)
Standard Mode は手っ取り早く作業したい人向けです
このボタンを有効にすると、最高品質の ADAA オーバーサンプリング技術をプラグイン全体に適応することが出来ます。
この機能は「ゲインステージングなんかしてられっか」という、すぐにプラグインの独特な挙動や音色が欲しい向けのクリエイティブモードです。難しいことは考えずにツマミをグリグリしましょう。もちろん、こちらの機能も入力信号レベルに依存した動作をしますが、特に考えずに始めるモードとして適切です。
ADAA は従来のオーバーサンプリングよりも劇的な低コストで約 10 倍 (約 20dB 分) ものエイリアシングノイズを軽減してくれます。
Standard Mode is for quick workflows
Enabling this button applies our highest-quality ADAA oversampling technology across the entire plugin.
This is a creative mode for those who think “I don’t have time for gain staging” — for anyone who just wants the plugin’s unique character and tone right away. Don’t overthink it, just turn the knobs. Of course, the processing still responds to input level, but this mode is designed as a no-fuss starting point.
ADAA reduces aliasing noise by approximately 10x (~20 dB) at dramatically lower cost compared to conventional oversampling.
Tube Drive は真空管の歪みとコンプレッション感を得たい人向けです
Tube Drive は真空管の動的動作を再現していますが、本物の真空管ラインアンプは非常に扱いづらいため、扱いやすいよう設計しました。できるだけ信号レベルを下げて、ツマミの適応量も下げて信号を通過させると、ダイナミクスの拡張感や、動的に反応するため Transient や Release 音に作用します。これは理論的な信号処理の考え方では真逆な解釈ですが、実際の音を聴くと、拡張されたように感じします。
もちろん、信号の入力レベルを強くし、ツマミを上昇させていくと常に真空管の強い歪みと飽和が得られます。特に強い飽和を得ると Tube 独特のコンプレッション動作により出力信号レベルが下がりますので AUTO LEVEL の機能を有効活用してください。
Hybrid モードより、Professional モードのほうが再現率は高いですが、Hybrid モードのほうが周波数領域の再現度は高いです。もし、個別でモードを分けたい場合は同一トラックに複数のインスタンスを立ち上げて、個別の Bypass 機能をお使いください。(設計上 Hybrid と Professional モードを同居することはできないため)
Tube Drive adds vacuum tube saturation and compression
Tube Drive reproduces the dynamic behavior of a vacuum tube, but since real tube line amplifiers are notoriously difficult to work with, we designed this to be much more manageable. Keep the input level low and the knob setting subtle — when signal passes through at lower levels, you’ll notice an expansion of dynamics and a responsive interaction with transients and release tails. This may seem counterintuitive from a theoretical signal processing perspective, but listen carefully — it actually feels like the dynamics have been enhanced.
Of course, pushing the input level harder and turning the knob up delivers the strong saturation and distortion characteristic of a tube. At high saturation levels, the tube’s natural compression behavior will reduce the output level — make good use of the AUTO LEVEL feature here.
Professional mode offers higher overall reproduction accuracy than Hybrid mode, but Hybrid mode excels in frequency-domain fidelity. If you want to use different modes for individual processing stages, insert multiple instances on the same track and use the per-section Bypass controls. (Hybrid and Professional modes cannot coexist within a single instance by design.)
Analog Expansion は L/R より M/S 推奨です
Analog Expansion はアナログ独特、特有のステレオイメージを模倣する機能です。通常のアナログ機器はどんなに頑張っても L と R で違う特性を持っています。アナログ機器のいいところではあるのですが、これが結構想定していたステレオイメージを崩す場合が多々あります。この制御をデジタル化しました。100% で実機と同じ LR の特性差になりますが、想定よりステレオイメージが崩れてしまった場合は % を下げてください。このステレオの拡張を M/S 処理に持ち込むと非常に安定した拡張効果を得られるので、M/S を実装し、選択推奨しています。(位相問題を排除したかったので L/R での周波数特性の固有の再現は避けています。)
We recommend M/S mode for Analog Expansion
Analog Expansion emulates the inherent stereo image characteristics unique to analog equipment. No matter how precisely calibrated, real analog hardware always exhibits slightly different characteristics between the L and R channels. While this is part of the charm of analog gear, it can often disrupt the intended stereo image. We’ve digitized this control. At 100%, the L/R characteristic difference matches the real hardware, but if the stereo image shifts more than expected, reduce the percentage. Applying this stereo expansion in M/S processing yields a much more stable widening effect, which is why we implemented M/S mode and recommend it as the default. (We intentionally avoided per-channel frequency response reproduction in L/R mode to eliminate phase issues.)
Transformer Tolerance の低域のディティール変化
Transformer Tolerance に入力していく時に低域の変化を聴きながら調整してください。Tube Drive は信号を突っ込みすぎると、コンプレッション感が強く、ダイナミック動作が顕著に低下しますが、この Transformer Tolerance は入力を飽和しても音像が崩壊しにくい設計となっております。低域に強い作用が発生する場合、高域が下がったように聴こえます。後段の High Shelf で調整してみてください。
Hybrid Mode で Trans の再現が顕著です。ただし、若干 Transient やエンベロープ変化の再現度が Professional+ や Extreme に劣ります。ただし、再現率の低さを聴感上感じることは中々難しい状況まで追い込んでいます。個別のバイパスを駆使して Tube は Professional モード、Trans は Hybrid モードを利用するなど、多彩な運用をお考えください。
Low-End Detail Variation
When adjusting Transformer Tolerance, listen carefully to the low-frequency changes as you increase the setting. Unlike Tube Drive, which exhibits strong compression and a noticeable reduction in dynamic behavior when driven hard, Transformer Tolerance is designed to maintain the integrity of the sound image even when the input is pushed into saturation. When a strong low-frequency effect occurs, the highs may appear to drop — use the High Shelf downstream to compensate.
Hybrid Mode delivers the most pronounced Transformer reproduction. However, transient and envelope tracking accuracy is slightly lower than Professional+ or Extreme modes. That said, we have pushed the quality to a point where the difference is very difficult to perceive audibly. Consider using the per-section bypass controls creatively — for example, running Tube in Professional mode and Trans in Hybrid mode across multiple instances.
Core Hysteresis and Hysteresis Bloom
Core Hysteresis は低域の磁気飽和を強制的に増強するツマミです。初期値が 2.5 にしていますが 0 が Transformer の純粋な信号処理となります ので、0を基準として考えてください。かなり低域の飽和感や全体の歪み感が強くなります。それによって低域が滲んだり、ぼやけたりした場合は Bloom のツマミで低域のフォーカスが合うパラメータを探してください。この機能は非常に強力なため、是非 Low-end の新たな次元の拡張を体感してください。エンジニアが手作業で音を確認しならが調整しました。その威力を実感してください。
Core Hysteresis forcibly enhances the magnetic saturation effect in the low frequencies. The default value is set to 2.5, but 0 represents the pure transformer signal processing — use 0 as your baseline. This knob significantly increases low-end saturation and overall harmonic distortion. If the low end becomes smeared or unfocused as a result, use the Bloom knob to find the sweet spot that brings the low frequencies back into focus. This feature is extremely powerful — experience a whole new dimension of low-end extension. Every parameter was hand-tuned by an engineer while listening critically. Feel the impact for yourself.
超極低域の HPF の威力
このプラグインには本物のトランス由来の 5Hz と 5.47Hz が選択できる超極低域のローカット、もといハイパスフィルターが実装されています。この機能の威力を感じてください。個別の Bypass ON/OFF ボタンが役に立ちます。
また、この機能は Clipper との相性が抜群です。Clipper を有効にしつつ、5.0Hz / 5.47Hz と Clipper の Pre / Post のボタンをポチポチしてください。強力な効果が期待できます。(実際には些細な変化なので集中して切り替えてください。)
Core Hysteresis や Bloom の調整をする時にこの HPF は OFF のほうがいい場合があります。
低域のリリースの変化を十分に考慮して ON/OFF を吟味してください。場合によっては後段に別の Linear Phase HPF や高性能な IIR HPF の利用を検討してください。
The Power of Ultra-Sub-Bass HPF
This plugin features an ultra-sub-bass high-pass filter with selectable cutoff frequencies of 5 Hz and 5.47 Hz — both derived from real transformer measurements. Experience the impact of this feature. The per-section Bypass ON/OFF button is invaluable here.
This feature pairs exceptionally well with the Clipper. With the Clipper engaged, try toggling between 5.0 Hz / 5.47 Hz and switching the Clipper’s Pre / Post position. Powerful results await. (The changes are subtle in reality, so switch with focus and concentration.)
When adjusting Core Hysteresis or Bloom, disabling this HPF may yield better results in some cases.
Carefully evaluate the ON/OFF state with attention to how the low-end release behavior changes. Depending on the material, consider placing a separate linear-phase HPF or high-quality IIR HPF after this plugin.
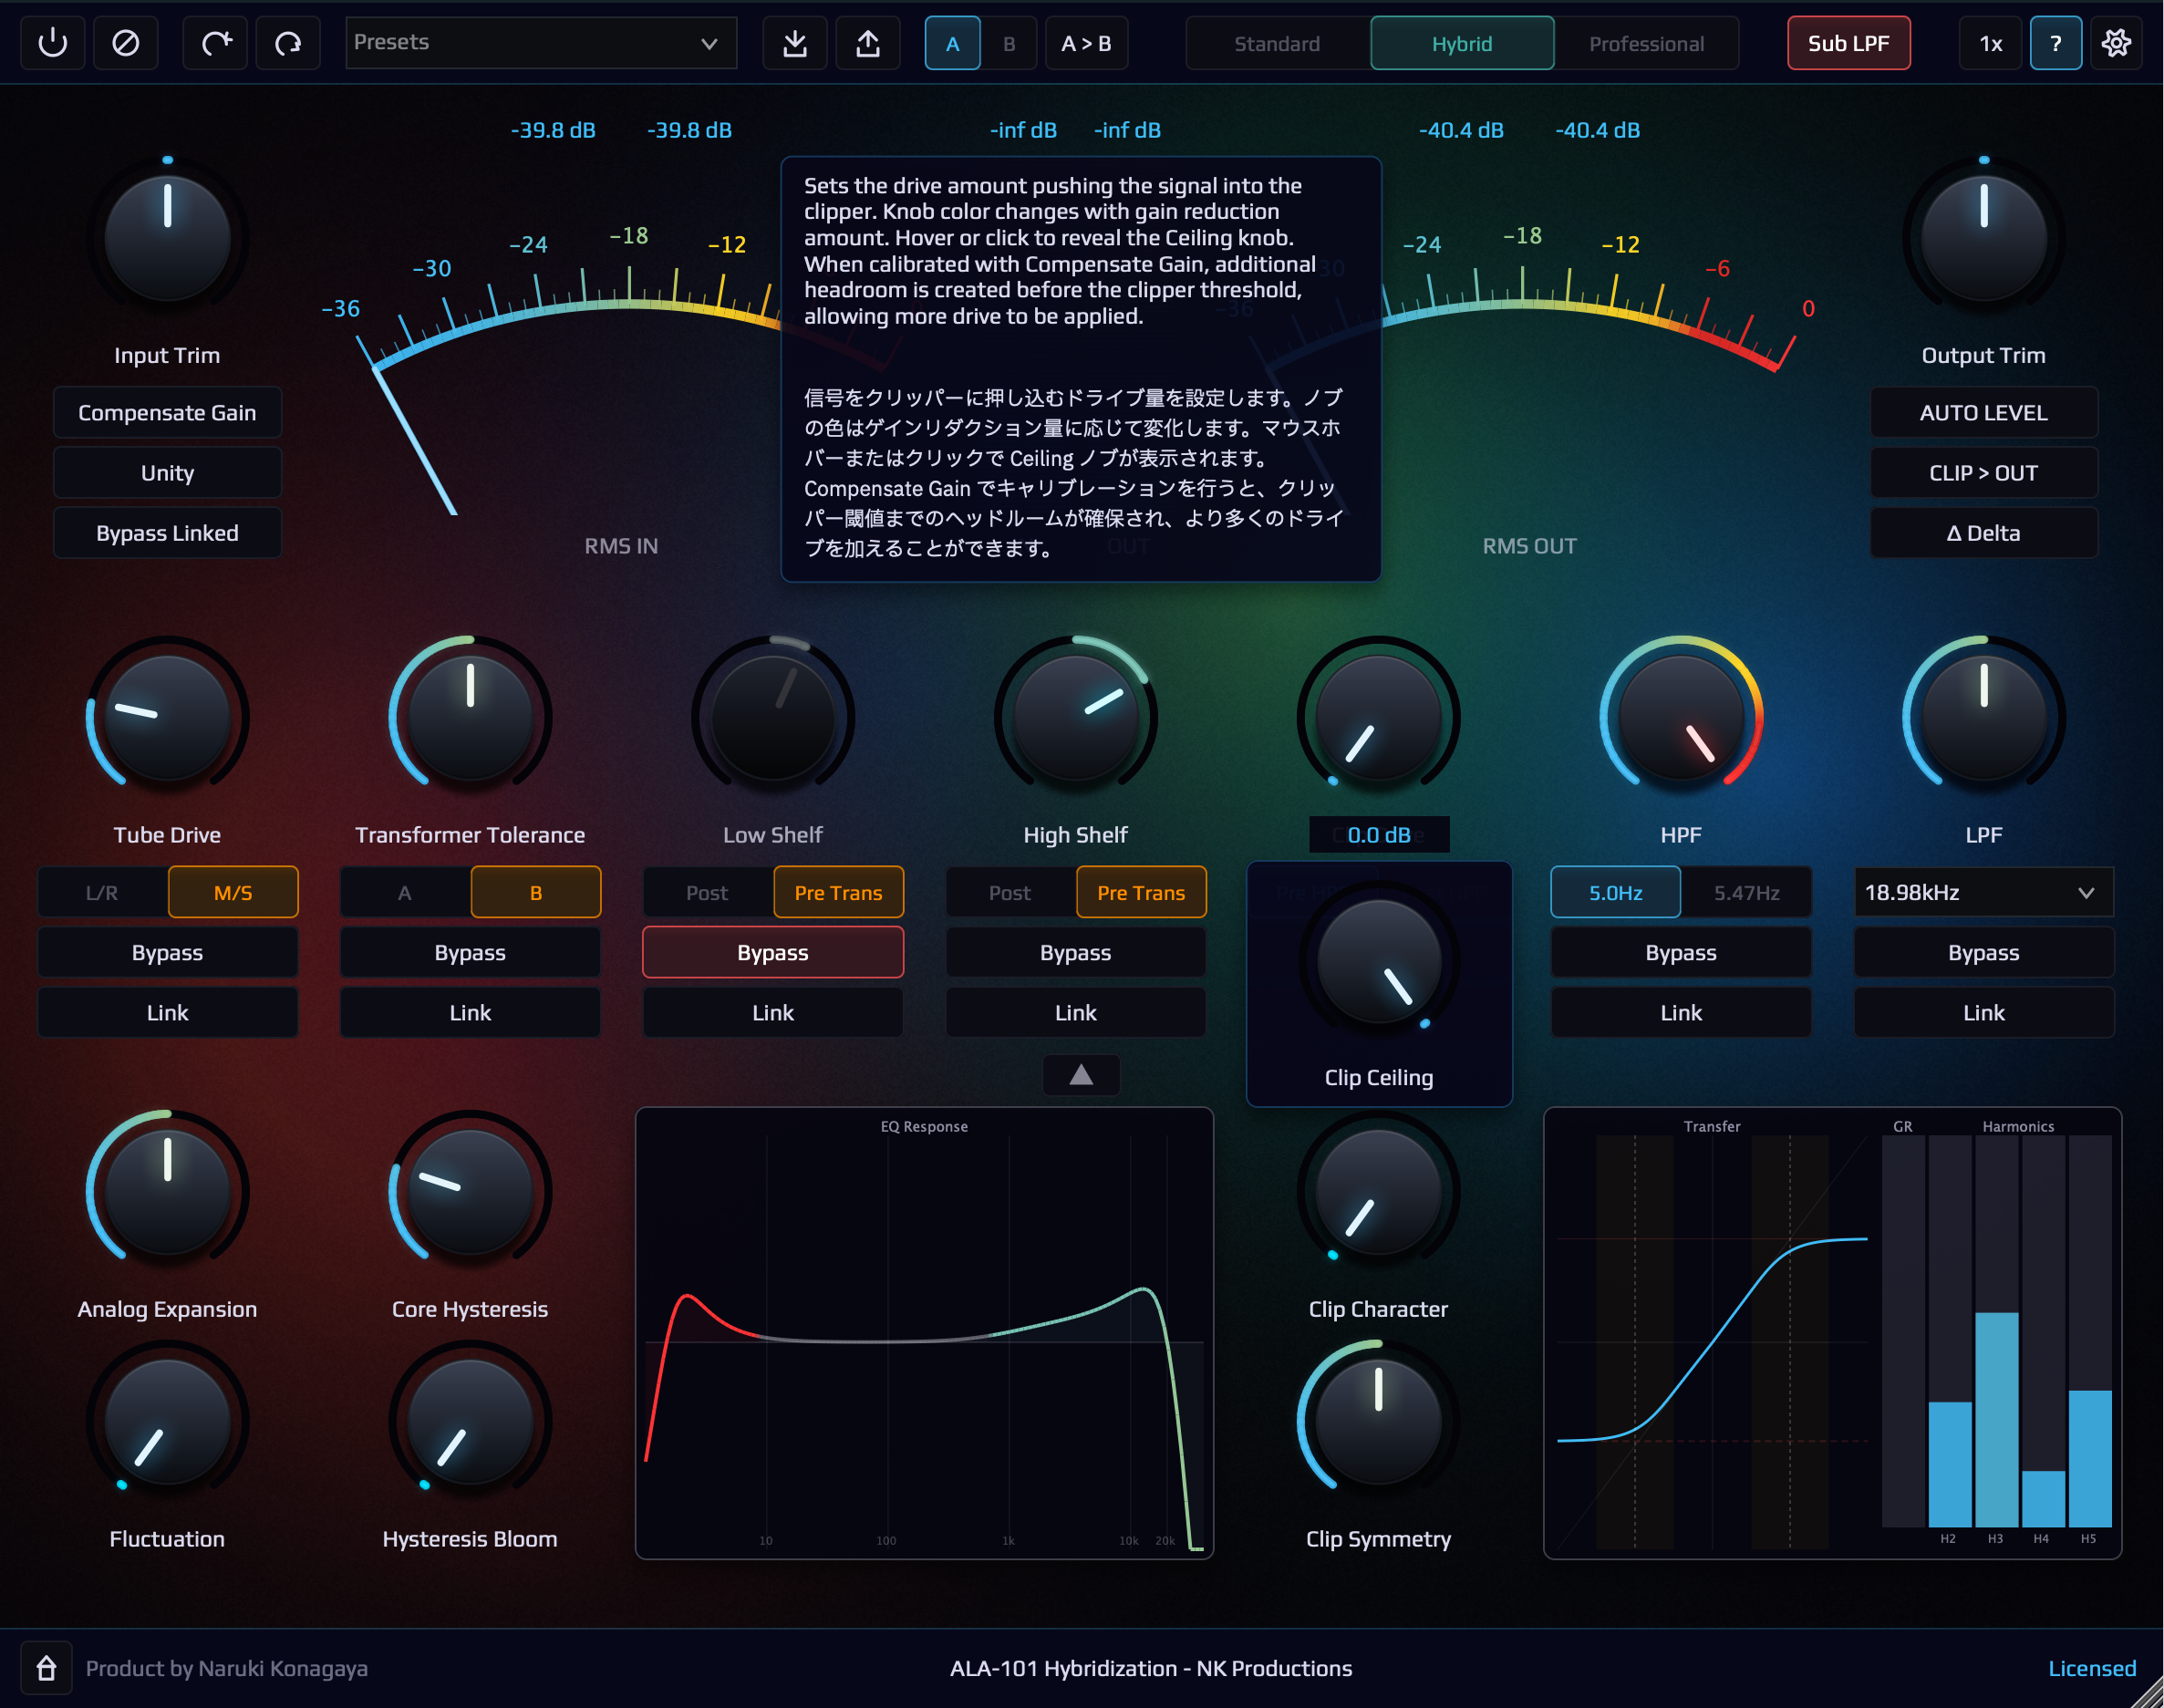
搭載されている Clipper はアナログ仕様です
ALA-101 Hybridization には Clipper が搭載されており、Clip Celling 機能がありますが、これはデジタルのサンプルピークを正確に制御する天井ではありません。アナログクリッパーを模倣しているため、Clipper の Drive の数値を上昇させていけば、容易にオーバーシュート (0dBFS オーバー) を起こします。Celling 値はあくまでアナログクリッパーの天井 (アナログの最大出力レベル) を定義するための値です。
確実に Celling を制御したい場合は後段に高性能な Limiter や True Peak 制御が可能なプラグインを後段に利用してください。
クリッパーの設計はこだわり抜いたので、この機能を有効にして Clip Character と Clip Symmetry、Clip Drive をほんの数 % 微調整するだけで十分な場合もあります。ADAA のオーバーサンプリングが有効な新世代型のハイブリットアナログモデリングクリッパーです。
The Clipper is Analog-Modeled
ALA-101 Hybridization includes a Clipper with a Clip Ceiling control, but this is not a digital sample-peak ceiling that precisely controls the absolute maximum. Since it emulates an analog clipper, increasing the Clipper Drive will easily cause overshoots (exceeding 0 dBFS). The Ceiling value defines the analog clipper’s ceiling — the maximum output level of the analog circuit.
If you need precise ceiling control, place a high-quality limiter or true-peak limiting plugin after this plugin.
The clipper has been meticulously designed — in many cases, simply engaging it and making subtle adjustments of just a few percent to Clip Character, Clip Symmetry, and Clip Drive is all you need. This is a next-generation hybrid analog-modeled clipper with ADAA oversampling built in.
使い方
プラグインを DAW の Insert に挿入してください。Bus Track や Master Track 向けですが、もちろん単体トラックにもご利用ください。
信号がプラグインに入力されたら『Compensate Gain』ボタンを押してください。プラグインが自動的にプラグインのための Gain Staging を行います。ここがスタートです。測定は 約 6 秒 程かかりますが、お待ち下さい。入力された信号を公証の基準の信号レベルに自動的に合わせて、出力される信号レベルも自動で補正します。
好きなようにツマミを動かしてみてください。周波数自体の変化が大きくないので差異が知覚しづらい可能性がありますが、それは認知出来ない違いがあるということを示しています。『Δ Delta』のボタンを押して確かめてください。元々の信号との差を聴覚的に認識できます。
最初は 50% を目安にツマミを回していきましょう。各パラメータで処理が実行されると、基本的には出力レベルや出力 LUFS が下がります。これは正常な動作であり、信号処理が実行されるとアナログ回路の模倣による処理によってピークが減少したり動的なコンプレッション動作が発生します。EQ や Clip Drive などはその限りではありません。
信号の聴感レベルが変わると、Bypass と ON で比較が難しくなるで『AUTO LEVEL』ボタンを押してください。LUFS を Bypass 時と処理時で揃えるため、ON と Bypass での比較作業が非常に効率的に行えます。
各ツマミの ON/Bypass や Main Bypass と ON の切り替えをして、プラグインでどんな音像の変化があったのか、十分に吟味してください。必ずしも貴方が納得する音になるわけではないと思います。プラグインを Bypass にしたたまにする勇気を持って下さい。
動作が重い場合
Unity を活用してみる
信号レベルを自動調整したあと、『Unity』ボタンを有効にして信号の Push/Pull を実行してみてください。入力を Hot にしていけば音の圧縮感が強くなり、歪みの感じ方も強くなります。入力を Cold にしていけば実際に信号の Dynamics が拡張しているわけではないのに、Dynamics の拡張や分離度などが感じられます。
その他
Clipper の 『Ceiling』値は 初期 0.0 dBFS のため、インプットレベルを下げた場合、Clipper に当たるまでの Headroom が非常に大きくなります。その場合は Ceiling 値を下げて Clipper を利用してみてください。
『OUT > CLIP』 ボタンを押すと、Output Trim の後に Clipper がアサインされます。信号レベルの Ceiling に有効です。この時『AUTO LEVEL』ボタンが無効になります。これは正しい反応で Clipper の前の Output Trim のレベルが変動してしまうと Clipper の動作が変動してしまうためです。信号理論的にも DSP 構造的にも意味のないボタンになるため、無効は正しい処理です。
『Δ Delta』 または『Dry/Wet』ボタンを有効にすると、いくつか DSP 構造的に非決定的な処理の機能が Bypass されます。これは機能の信号処理的にも DSP 構造的にも差分を聴くことが理論上不可能なため、Bypass を明示しています。
CPU の消費率は Tube Drive や Transformer Tolerance を有効にしているときは多くなります。これは高度なモデリングをリアルタイムで実行しているためです。この問題はバッファサイズを変更しても解消しない可能性があります。これは高度なリアルタイムモデリング処理を採用しているために計算の物理限界があるためです。セッションによっては大量にアサイン出来ない、同一トラックに複数のインスタンスを持てない可能性があります。オーバーサンプリング機能も OFF にするなど検討してください。初期値は 2 倍です。

▼ のボタンを押すと、さらなるオプションにアクセスできます。GUX も装備しています。
How to Use
Insert the plugin on a DAW insert slot. It is designed for bus tracks and the master track, but of course it works on individual tracks as well.
Once signal is feeding into the plugin, press the “Compensate Gain” button. The plugin will automatically perform gain staging for you. This is your starting point. The measurement takes approximately 6 seconds — please wait for it to complete. It automatically aligns the input signal to the calibrated reference level and compensates the output level accordingly.
Turn the knobs freely and explore. Since the frequency-domain changes are not dramatic, you may find it difficult to perceive the differences — but that means there are changes beyond conscious perception. Press the “Δ Delta” button to confirm. You can audibly hear the difference between the processed and original signal.
Start by setting knobs around 50%. When processing is applied, the output level and LUFS will generally decrease. This is normal behavior — the analog circuit emulation causes peak reduction and dynamic compression. EQ and Clip Drive are exceptions to this rule.
When the perceived loudness changes, comparing Bypass vs. ON becomes difficult — press the “AUTO LEVEL” button. It matches the LUFS between bypassed and processed states, making A/B comparison far more efficient.
Use the per-knob ON/Bypass and the Main Bypass toggle to carefully evaluate what sonic changes the plugin is making. The result may not always match your expectations — have the courage to leave the plugin bypassed when it’s not adding value.
If Performance is Heavy
Due to the highly advanced DSP modeling, the plugin may feel CPU-intensive. Try turning oversampling OFF, or select the Standard button. The default oversampling is 4x.
Make Use of Unity
After auto-calibrating the signal level, enable the “Unity” button and experiment with pushing and pulling the input level. Pushing the input hotter increases compression and saturation. Pulling it colder — while not technically expanding the dynamics — creates a perceived sense of dynamic expansion and improved separation.
Additional Notes
The Clipper’s “Ceiling” value defaults to 0.0 dBFS. If you have reduced the input level, the headroom before the clipper threshold becomes very large. In that case, lower the Ceiling value to make effective use of the Clipper.
Pressing the “OUT > CLIP” button places the Clipper after the Output Trim — useful for output-level ceiling control. When this is active, the “AUTO LEVEL” button is disabled. This is correct behavior — if the Output Trim level (before the Clipper) were to fluctuate, it would alter the Clipper’s behavior. The button becomes meaningless from both a signal theory and DSP architecture perspective, so disabling it is the correct response.
Enabling “Δ Delta” or “Dry/Wet” will bypass certain non-deterministic DSP processes. This is explicitly indicated because hearing the difference of these processes is theoretically impossible from both a signal processing and DSP structural standpoint.
CPU consumption increases when Tube Drive or Transformer Tolerance is active, as advanced real-time modeling is being executed. This issue may not be resolved by increasing the buffer size — there are physical computational limits inherent to real-time modeling. Depending on your session, you may not be able to assign many instances or place multiple instances on the same track. Consider turning off the oversampling feature as well. The default is 2x.